今天来学习flutter的几个基本组件
基础组件
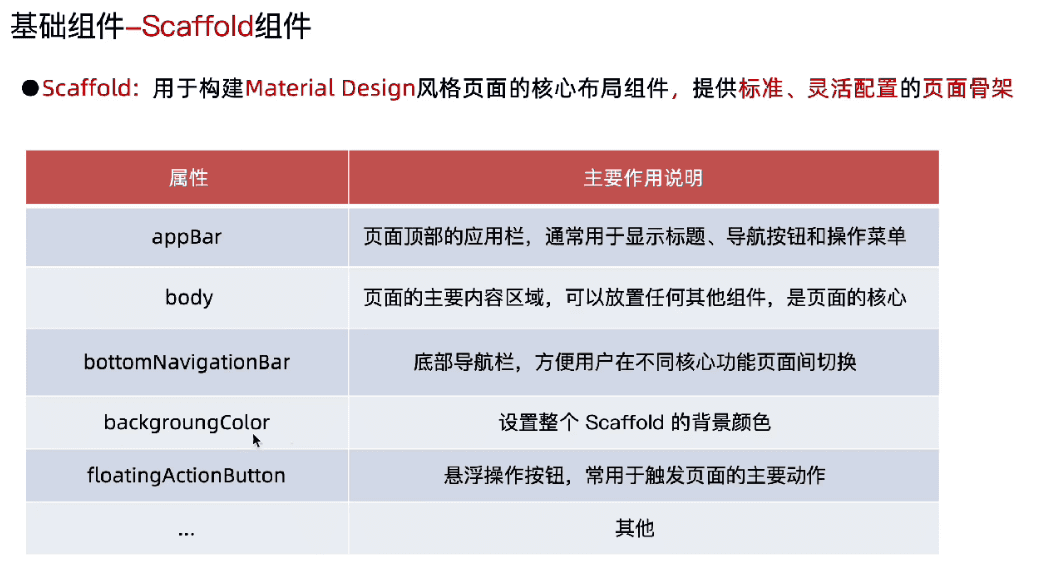
Scaffold组件
1
2
3
4
5
6
7
8
9
10
11
| import 'package:flutter/material.dart';
void main() {
runApp(
MaterialApp(
title: "终末地AI群聊",
theme: ThemeData(scaffoldBackgroundColor: Colors.lightBlueAccent),
home: Scaffold(),
),
);
}
|
上一篇我们学到的这个里有个Scaffold组件
这里我们
1
2
3
4
5
6
7
8
9
10
11
12
13
14
15
16
17
18
19
20
| import 'package:flutter/material.dart';
void main() {
runApp(
MaterialApp(
title: "终末地AI群聊",
home: Scaffold(
appBar: AppBar(centerTitle: true, title: Text("终末地AI群聊")),
body: Container(child: Center(child: Text("终末地AI群聊"))),
bottomNavigationBar: Container(
height: 80.0,
child: Center(child: Text("终末地AI群聊")),
),
),
),
);
}
|

MaterialApp包裹整个应用形成统一的Material Design风格Scoffold组件可快速搭建页面骨架,如appBar、body、bottomNavigationBar等Container用来作为容器,设置高度(height),child用来存放子组件Text是用来显示文本的组件
其实
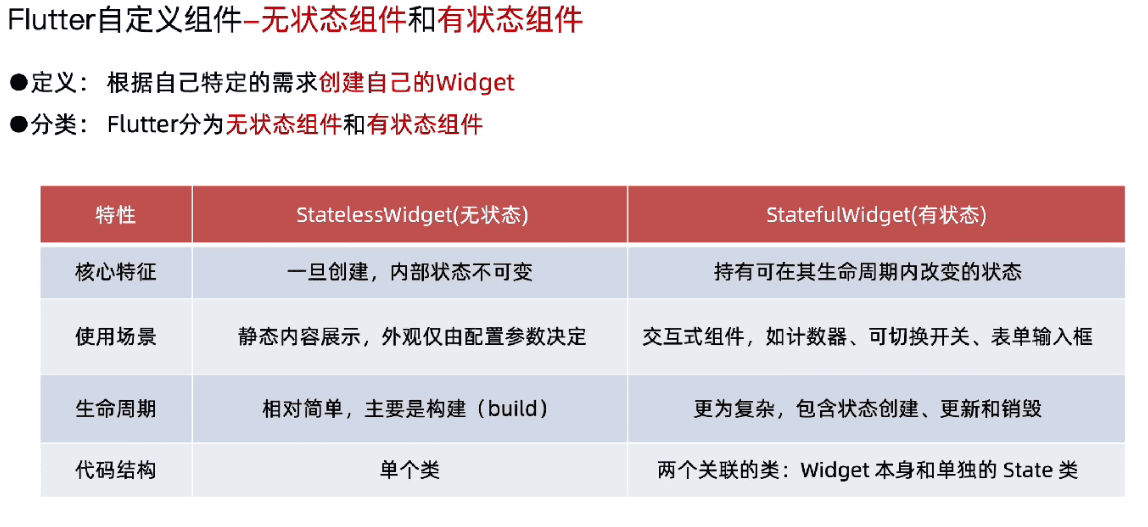
- StatelessWidget = 静态组件(数据显示后自己不会变)
- StatefulWidget = 动态组件(数据变了,界面会跟着变)
创建一个新的类,继承StatelessWidget类并实现build方法
build返回一个Widget
1
2
3
4
5
6
7
8
9
10
11
12
13
14
15
16
17
18
19
20
21
22
23
24
| import 'package:flutter/material.dart';
void main() {
runApp(MainPage());
}
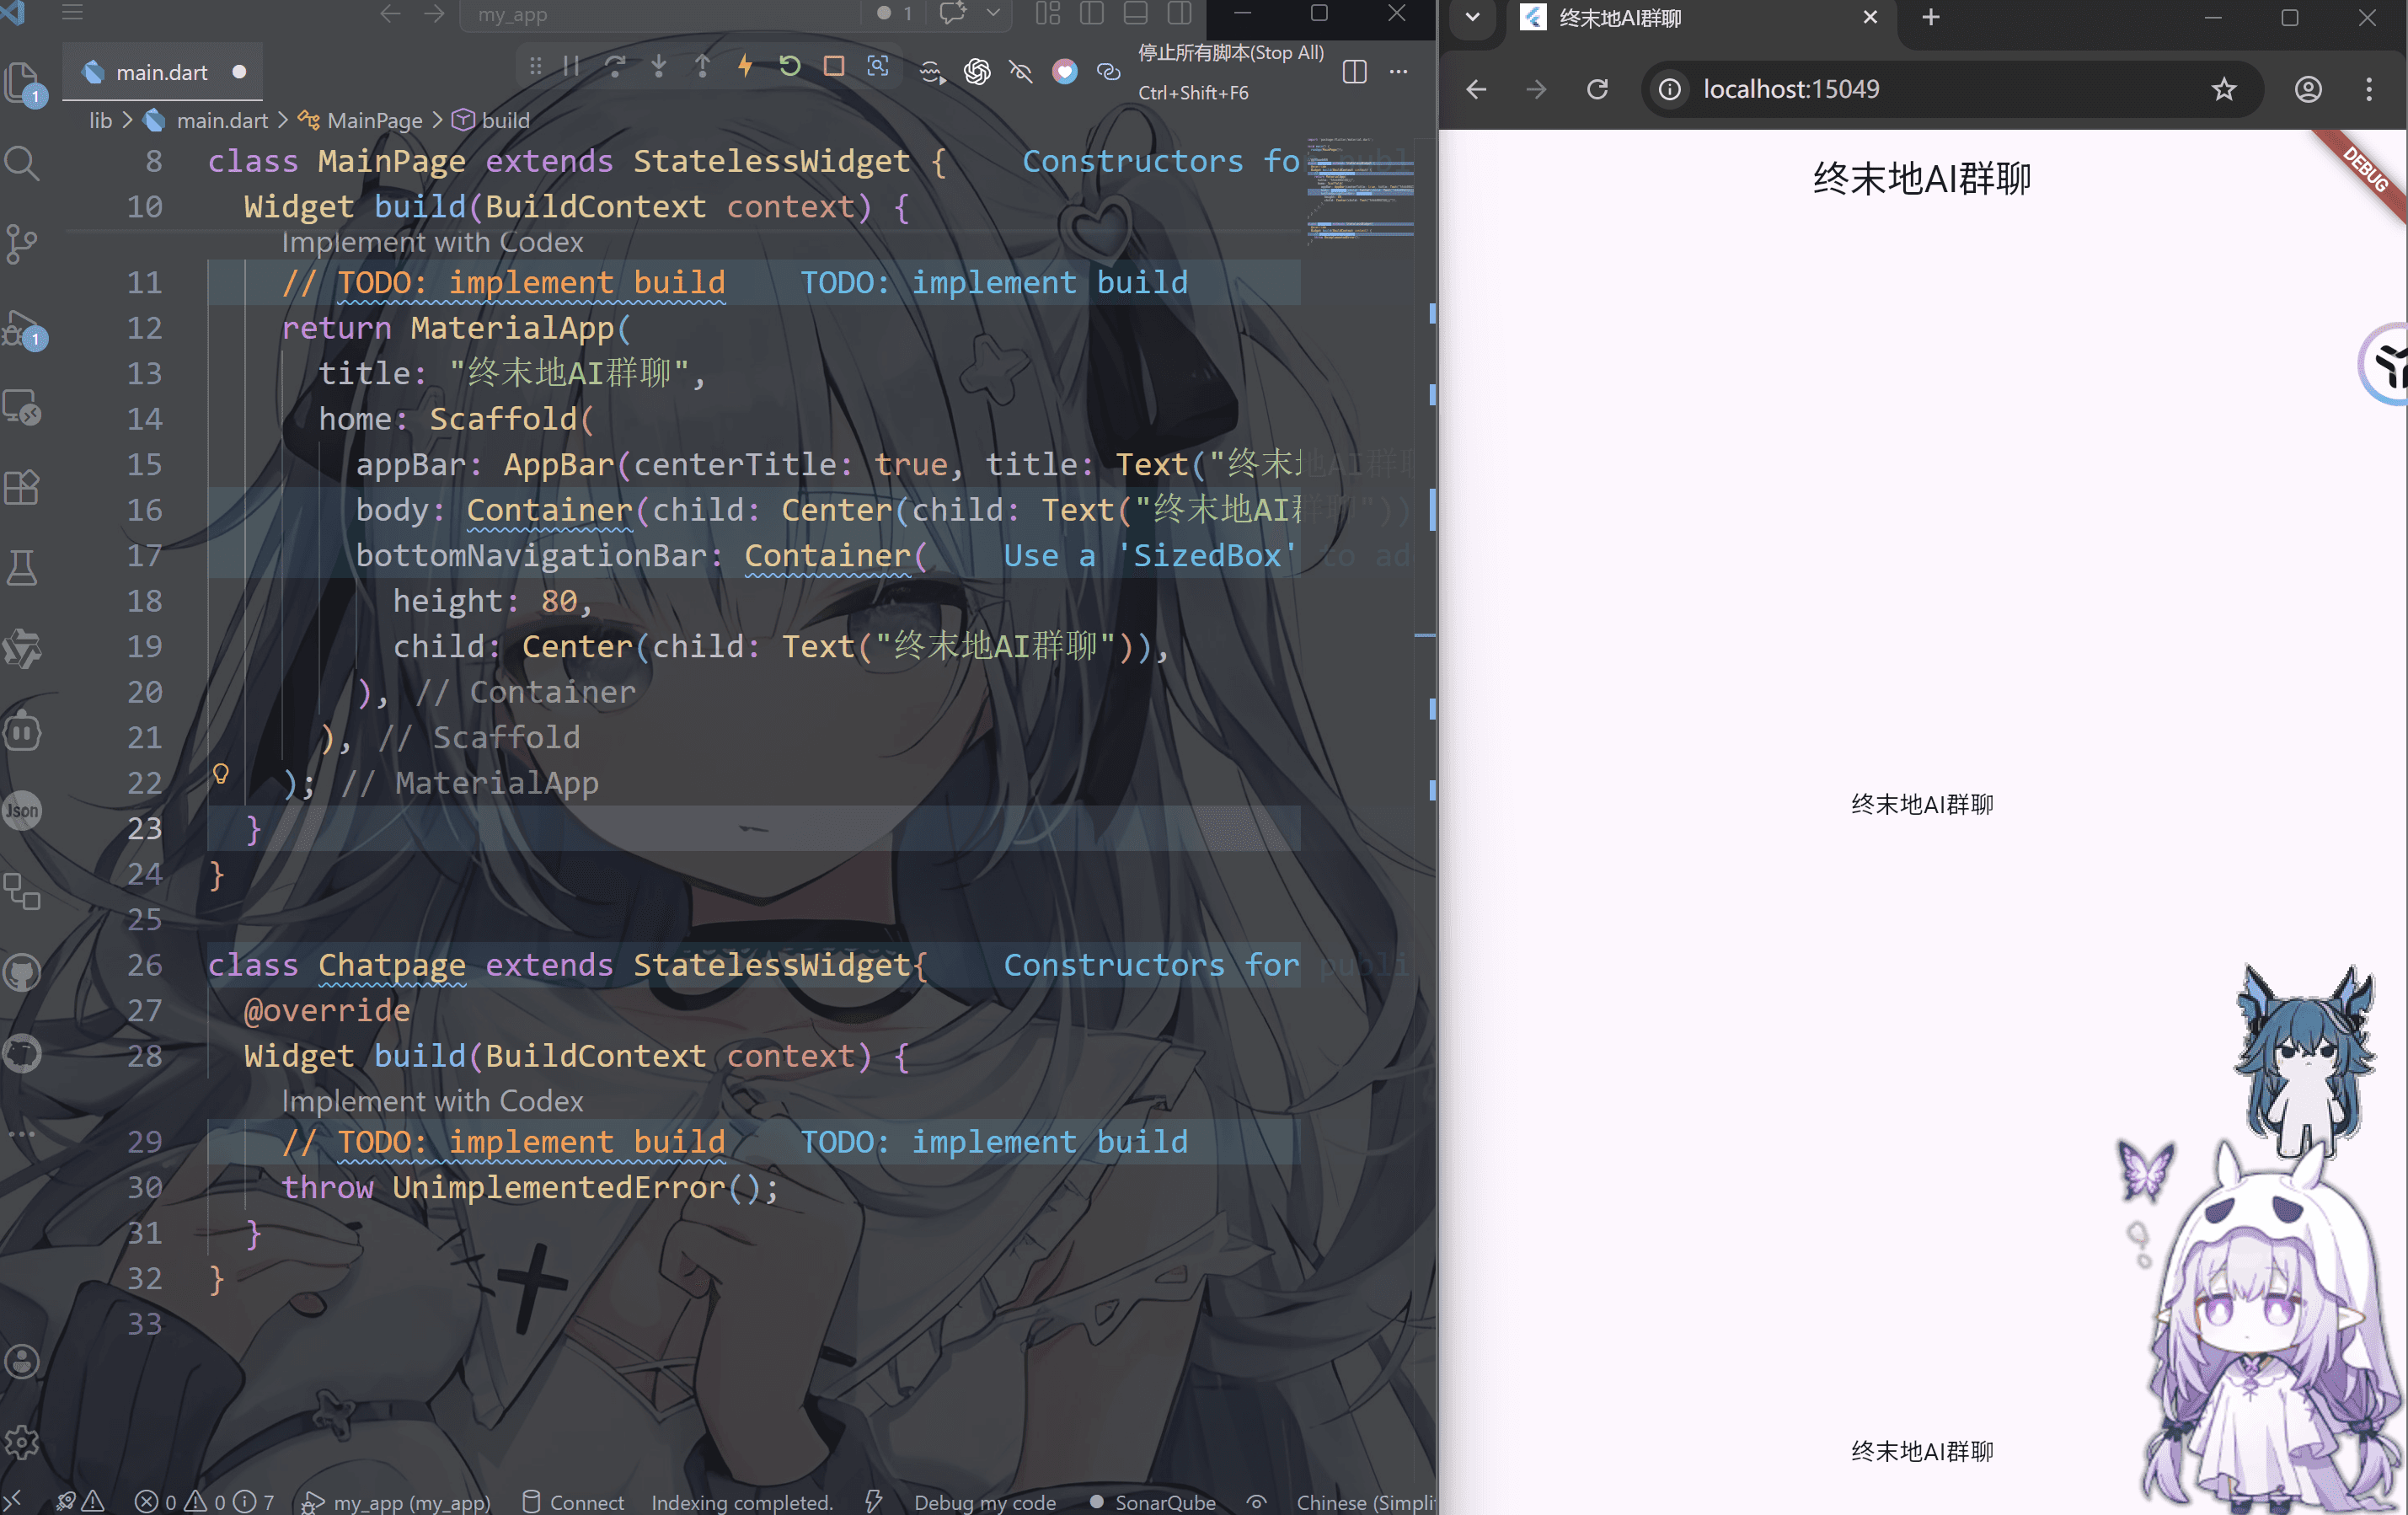
class MainPage extends StatelessWidget {
@override
Widget build(BuildContext context) {
return MaterialApp(
title: "终末地AI群聊",
home: Scaffold(
appBar: AppBar(centerTitle: true, title: Text("终末地AI群聊")),
body: Container(child: Center(child: Text("终末地AI群聊"))),
bottomNavigationBar: Container(
height: 80,
child: Center(child: Text("终末地AI群聊")),
),
),
);
}
}
|
1
2
3
4
5
6
7
| class Chatpage extends StatelessWidget{
@override
Widget build(BuildContext context) {
throw UnimplementedError();
}
}
|
我们把这个拆开来看
class Chatpage extends StatelessWidget继承 StatelessWidget,即定义了一个组件 Chatpage
Widget build(BuildContext context)必须重写 build(),这个的作用是返回要显示的UI,Flutter 会在 runApp();调用这个函数画界面
而return .....;返回值是Widget类型,因为在flutter里面所有的组件都是widget类型
这里我们注意
“程序入口” = 应用从哪里开始跑 在flutter中就是runApp(这里必须是“根组件”)
“组件” = 页面里的一块积木,根组件就是MaterialApp
而所有组件必须在根组件里使用
main() → 启动
MyApp → 应用壳子
MaterialApp → App框架
Scaffold → 页面结构
Text / Button → UI组件
1
2
3
4
5
6
7
8
9
10
11
12
13
14
15
16
17
18
19
20
21
22
23
24
25
26
27
28
29
30
31
32
33
34
35
36
37
38
| import 'package:flutter/material.dart';
void main() {
runApp(const MainPage());
}
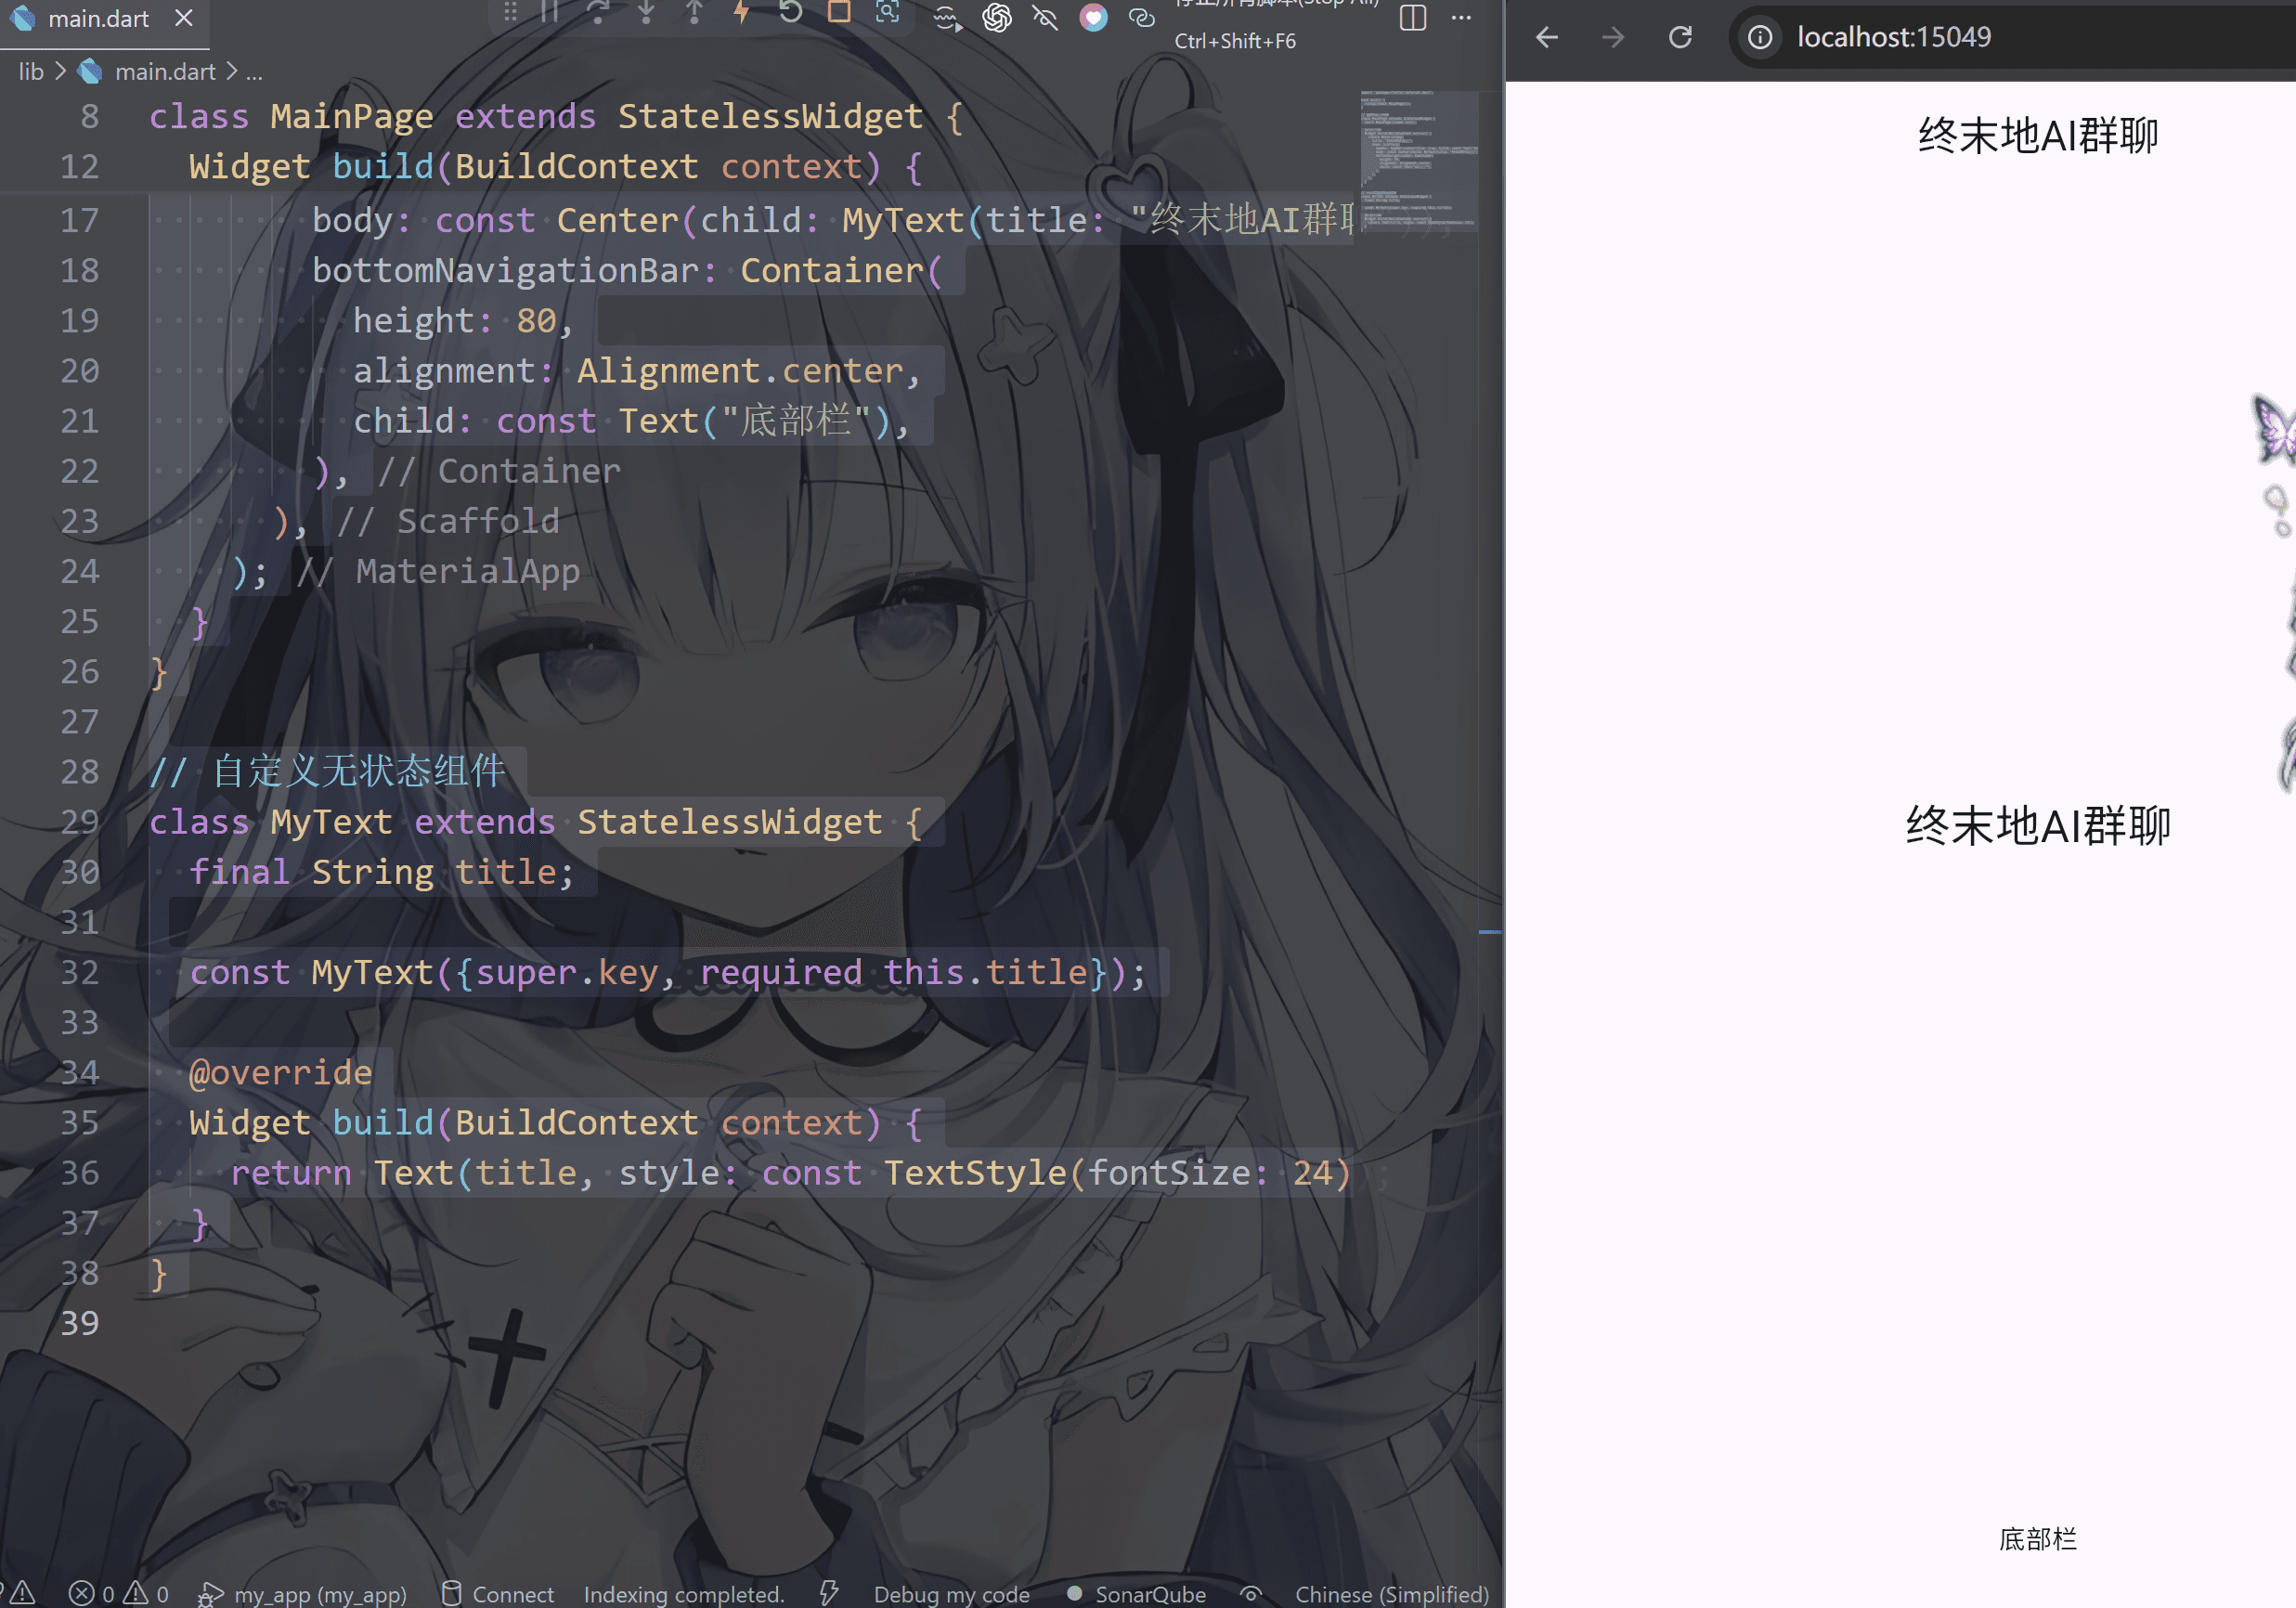
class MainPage extends StatelessWidget {
const MainPage({super.key});
@override
Widget build(BuildContext context) {
return MaterialApp(
title: "终末地AI群聊",
home: Scaffold(
appBar: AppBar(centerTitle: true, title: const Text("终末地AI群聊")),
body: const Center(child: MyText(title: "终末地AI群聊")),
bottomNavigationBar: Container(
height: 80,
alignment: Alignment.center,
child: const Text("底部栏"),
),
),
);
}
}
class MyText extends StatelessWidget {
final String title;
const MyText({super.key, required this.title});
@override
Widget build(BuildContext context) {
return Text(title, style: const TextStyle(fontSize: 24));
}
}
|
有状态组件是构建动态交互界面的核心,能够管理变化的内部状态,当状态改变时,逐渐会更新显示内容
1
2
3
4
5
6
7
| class MainPage extends StatefulWidget {
@override
State<StatefulWidget> createState() {
throw UnimplementedError();
}
}
|
class MainPage extends StatefulWidget 继承 StatelfulWidget,即定义了一个组件 Chatpage
Widget build(BuildContext context)必须重写 build(),这个的作用是返回要显示的UI,Flutter 会在 runApp();调用这个函数画界面
而return .....;返回值是Widget类型,因为在flutter里面所有的组件都是widget类型
1
2
3
4
5
6
7
8
9
10
11
12
13
14
15
16
17
18
19
20
21
22
23
24
25
26
27
28
29
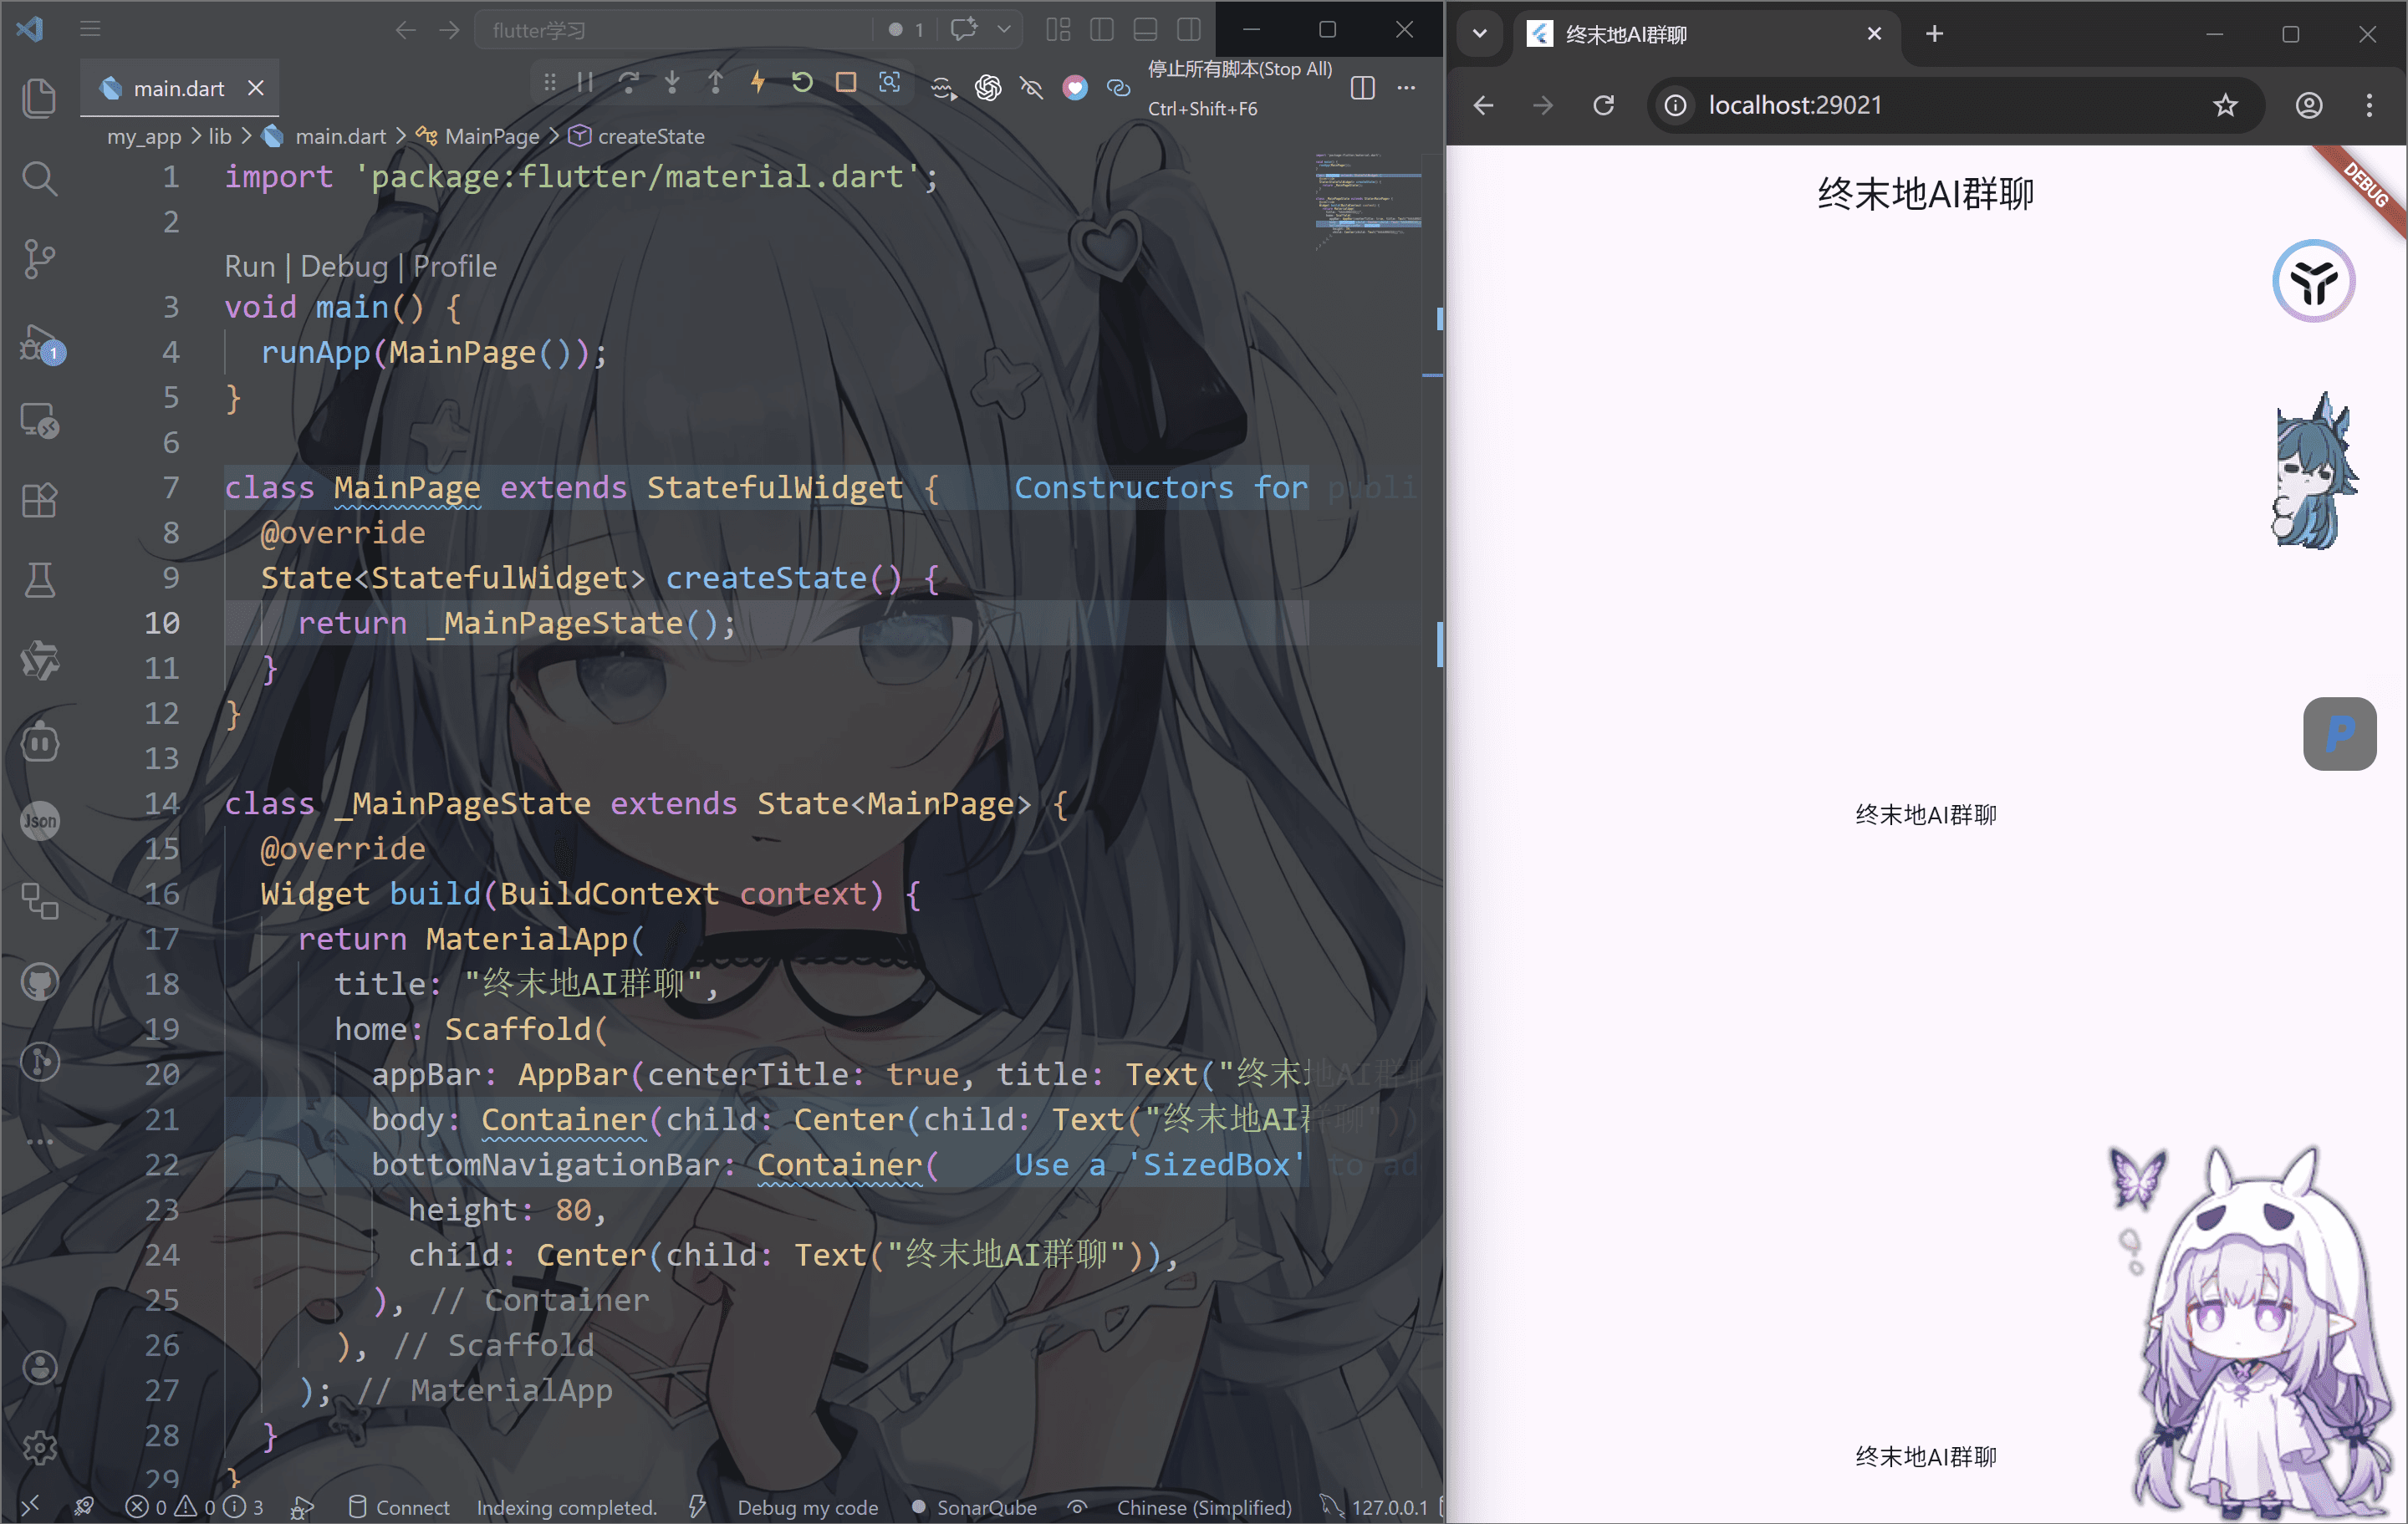
| import 'package:flutter/material.dart';
void main() {
runApp(MainPage());
}
class MainPage extends StatefulWidget {
@override
State<StatefulWidget> createState() {
return _MainPageState();
}
}
class _MainPageState extends State<MainPage> {
@override
Widget build(BuildContext context) {
return MaterialApp(
title: "终末地AI群聊",
home: Scaffold(
appBar: AppBar(centerTitle: true, title: Text("终末地AI群聊")),
body: Container(child: Center(child: Text("终末地AI群聊"))),
bottomNavigationBar: Container(
height: 80,
child: Center(child: Text("终末地AI群聊")),
),
),
);
}
}
|
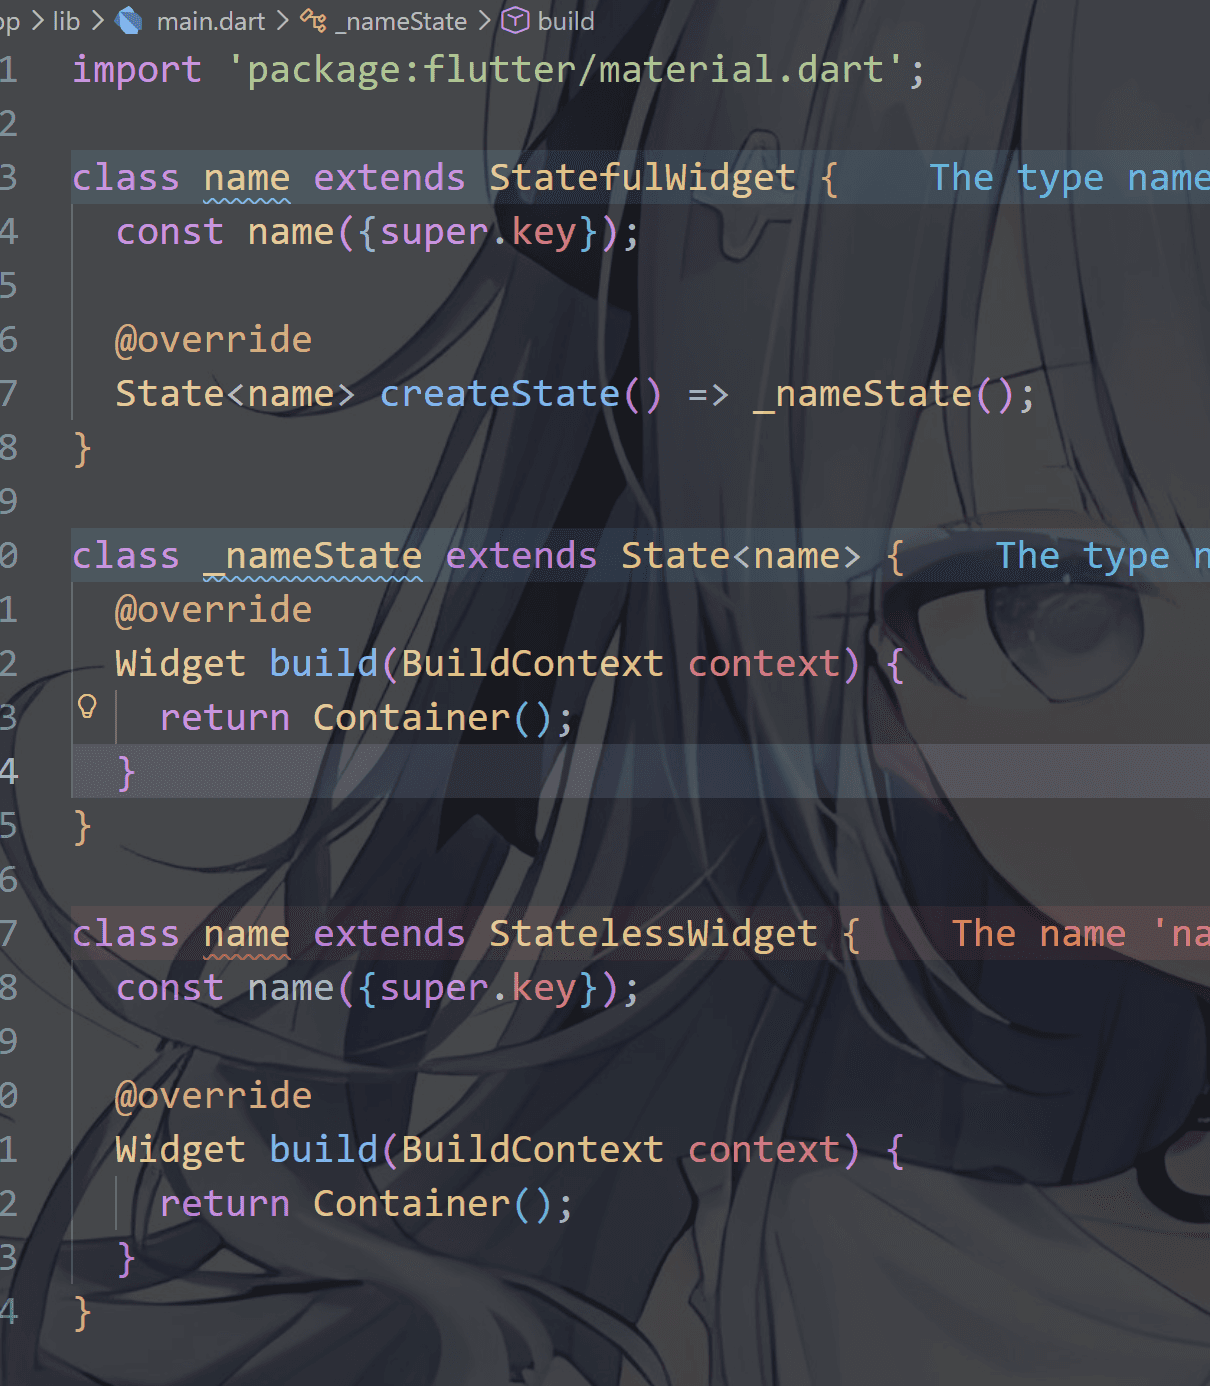
快速创建无状态组件和有状态组件的方法
首先下载这仨插件
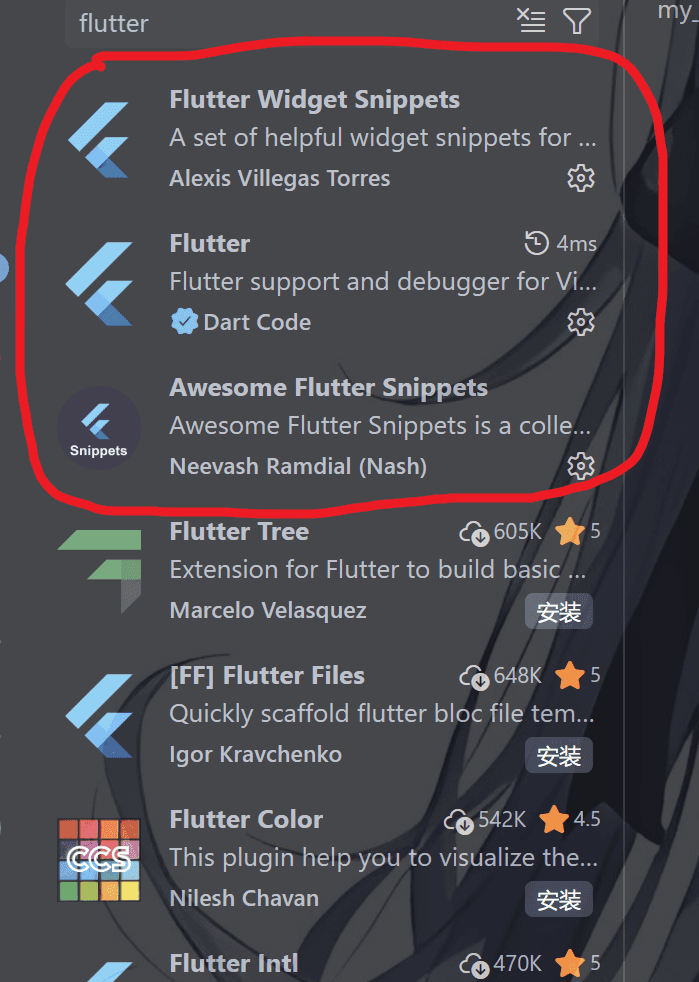
然后我们在VScode中使用statelessW 和statefulW按回车就可以快速创建
这里补充一个知识,在VScode中批量变量名或者方法名的方式有以下几种
| 场景 |
推荐方法 |
| 少量变量 |
Ctrl + D |
| 当前文件全部 |
Ctrl + Shift + L |
| 整个项目 |
Ctrl + Shift + H |
| 最安全(推荐) |
⭐ F2 |
1
2
3
4
5
6
7
8
9
10
11
12
13
14
15
16
17
18
19
20
21
22
23
24
25
26
27
28
29
| import 'package:flutter/material.dart';
void main() {
runApp(TestWidget());
}
class TestWidget extends StatefulWidget {
const TestWidget({super.key});
@override
State<TestWidget> createState() => _TestWidgetState();
}
class _TestWidgetState extends State<TestWidget> {
@override
Widget build(BuildContext context) {
return MaterialApp(
title: "终末地AI群聊",
home: Scaffold(
appBar: AppBar(centerTitle: true, title: Text("终末地AI群聊")),
body: Container(child: Center(child: Text("终末地AI群聊"))),
bottomNavigationBar: Container(
height: 80,
child: Center(child: Text("终末地AI群聊")),
),
),
);
}
}
|
组件生命周期-无状态组件
无状态组件的生命周期只有一个阶段——build方法
这个阶段的过程是:
① 创建(构造函数)
Flutter 创建这个组件实例
② build(构建 UI)
1
2
3
4
| @override
Widget build(BuildContext context) {
return Text("Hello");
}
|
唯一核心生命周期方法
当组件被创建或者父组件状态变化导致其需要重新构建时,build方法会被调用
1
2
3
4
5
6
7
8
9
10
11
12
13
14
15
16
17
18
19
20
21
22
23
| import 'package:flutter/material.dart';
void main() {
runApp(MainPage());
}
class MainPage extends StatelessWidget {
const MainPage({super.key});
@override
Widget build(BuildContext context) {
return MaterialApp(
home: Scaffold(
appBar: AppBar(centerTitle: true, title: Text("终末地AI群聊")),
body: Container(child: Center(child: Text("终末地AI群聊"))),
bottomNavigationBar: Container(
height: 80,
child: Center(child: Text("终末地AI群聊")),
),
),
);
}
}
|
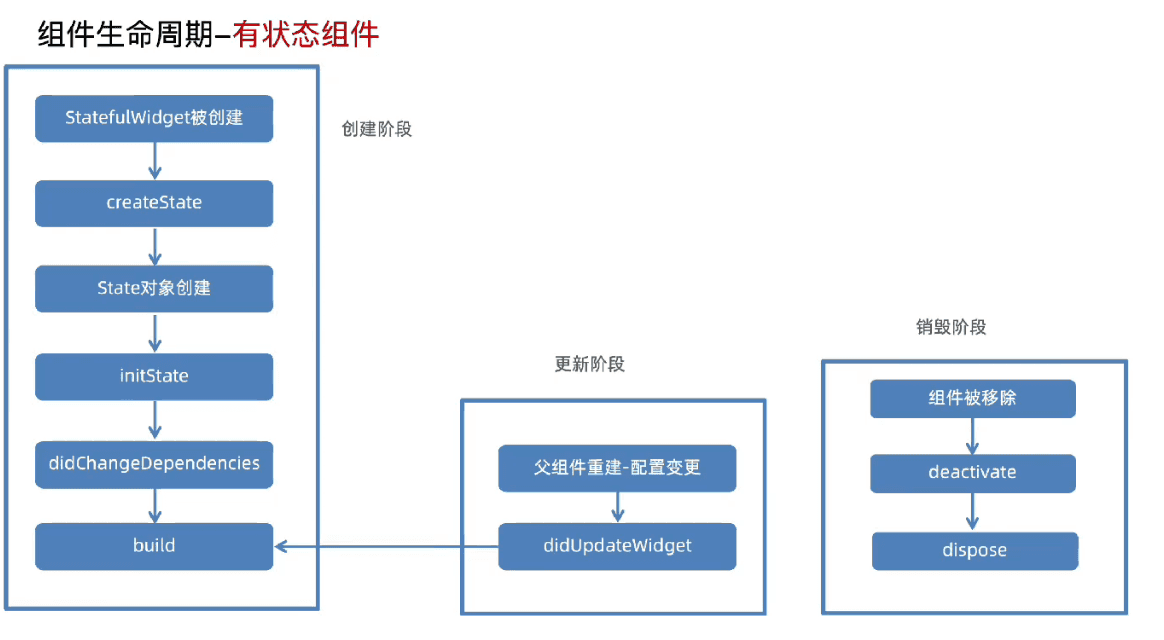
组件生命周期-有状态组件
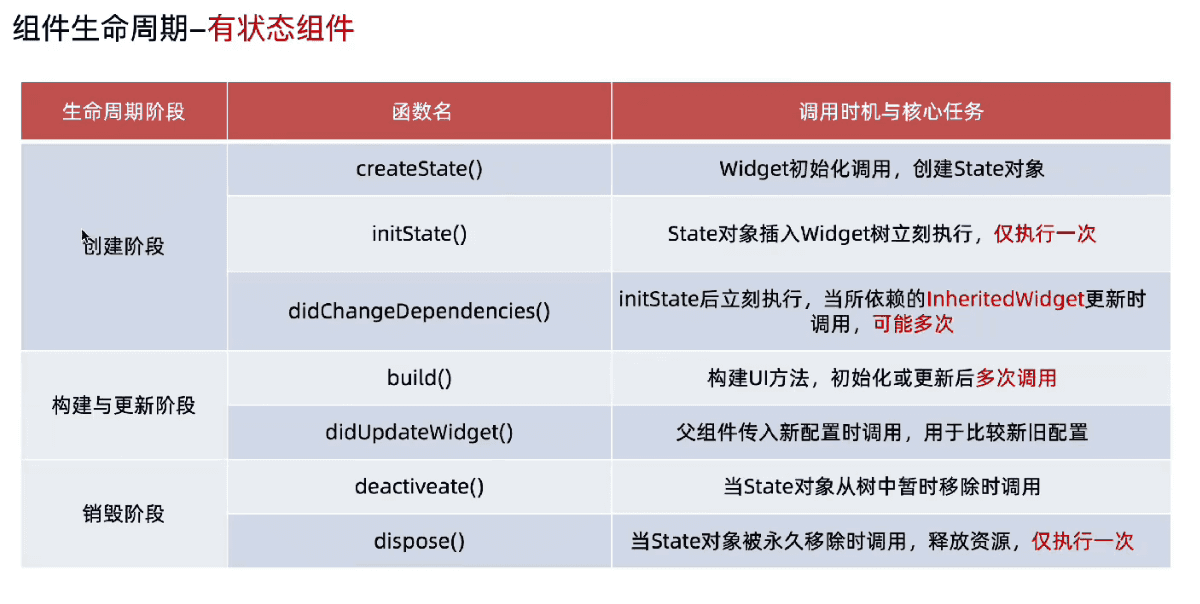
有状态组件 = 可以随时间改变 UI 的组件
1
| class MyWidget extends StatefulWidget
|
生命周期过程如下:创建 → initState → build →(多次 setState → build)→ dispose
1
2
3
4
5
6
7
8
9
10
11
12
13
14
15
16
17
18
19
20
21
22
23
24
25
26
27
28
29
30
31
32
33
34
35
36
37
38
39
40
41
42
43
44
45
46
47
48
49
50
51
| import 'package:flutter/material.dart';
void main() {
runApp(MainPage());
}
class MainPage extends StatefulWidget {
const MainPage({super.key});
@override
State<MainPage> createState() => _MainPageState();
}
class _MainPageState extends State<MainPage> {
@override
void initState() {
super.initState();
}
@override
void didChangeDependencies() {
super.didChangeDependencies();
}
@override
Widget build(BuildContext context) {
return Container();
}
@override
void didUpdateWidget(covariant MainPage oldWidget) {
super.didUpdateWidget(oldWidget);
}
@override
void deactivate() {
super.deactivate();
}
@override
void dispose() {
super.dispose();
}
}
|
- 无状态组件-build
- 有状态组件(创建阶段):createState->initState->didchangeDependencies->build
- 有状态组件(更新阶段):didUpdateWidget->build
- 有状态组件(销毁阶段):deactivate->dispose
- 执行一次函数:createState、initState、dispose
- Inheritedwidget:专门用于在Widget树中自顶向下高效地共享数据,顶层组件提供数据,子孙节点直接获取
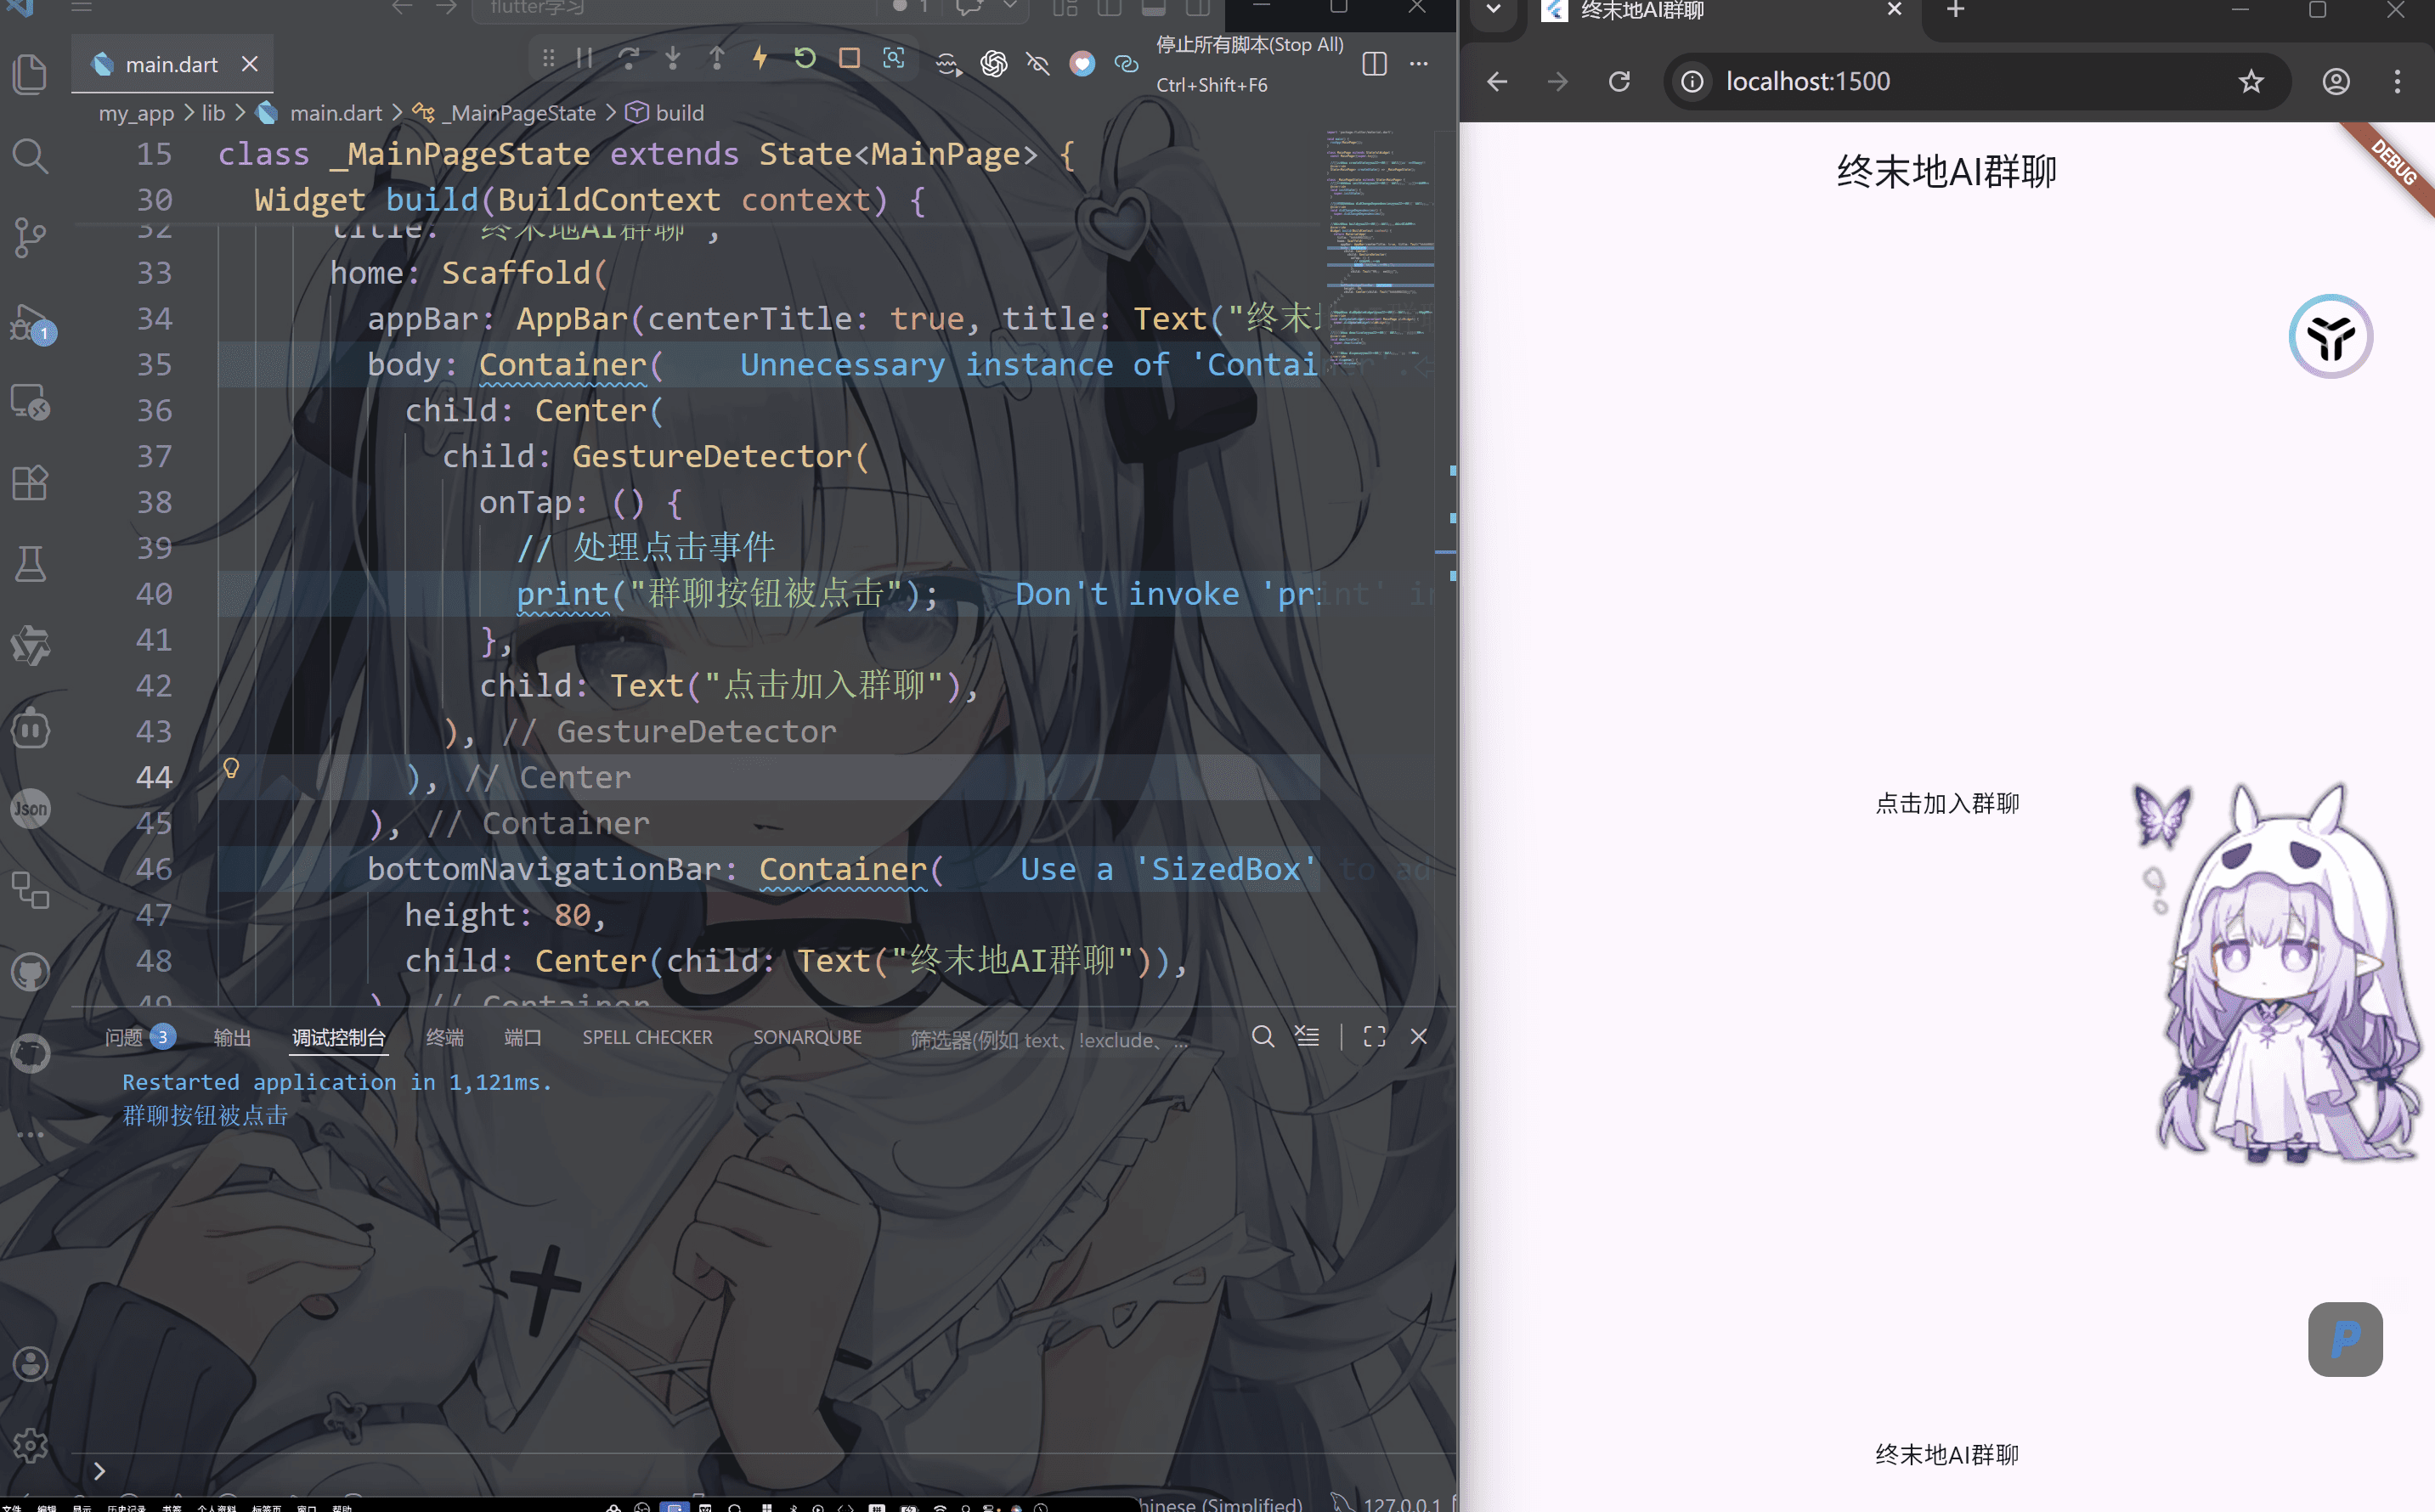
事件-点击事件GestureDetector
事件:用户与应用程序交互时触发的各种动作,比如触摸屏幕、滑动、点击等
点击事件:当点击某个元素触发的动作
常规方案:GestureDetector是Flutter中最常用、功能最丰富的手势检测组件
用法:使用GestureDetector包裹被点击的元素,传入onTap方法
1
2
3
4
5
6
7
8
9
10
11
12
13
14
15
16
17
18
19
20
21
22
23
24
25
26
27
28
29
30
31
32
33
34
35
36
37
38
39
40
41
42
43
44
45
46
47
48
49
50
51
52
53
54
55
56
57
58
59
60
61
62
63
64
65
66
67
68
69
70
71
72
73
74
75
76
| import 'package:flutter/material.dart';
void main() {
runApp(MainPage());
}
class MainPage extends StatefulWidget {
const MainPage({super.key});
@override
State<MainPage> createState() => _MainPageState();
}
class _MainPageState extends State<MainPage> {
@override
void initState() {
super.initState();
}
@override
void didChangeDependencies() {
super.didChangeDependencies();
}
@override
Widget build(BuildContext context) {
return MaterialApp(
title: "终末地AI群聊",
home: Scaffold(
appBar: AppBar(centerTitle: true, title: Text("终末地AI群聊")),
body: Container(
child: Center(
child: GestureDetector(
onTap: () {
print("群聊按钮被单击");
},
onDoubleTap: () {
print("群聊按钮被双击");
},
child: Text("点击加入群聊"),
),
),
),
bottomNavigationBar: Container(
height: 80,
child: Center(child: Text("终末地AI群聊")),
),
),
);
}
@override
void didUpdateWidget(covariant MainPage oldWidget) {
super.didUpdateWidget(oldWidget);
}
@override
void deactivate() {
super.deactivate();
}
@override
void dispose() {
super.dispose();
}
}
|
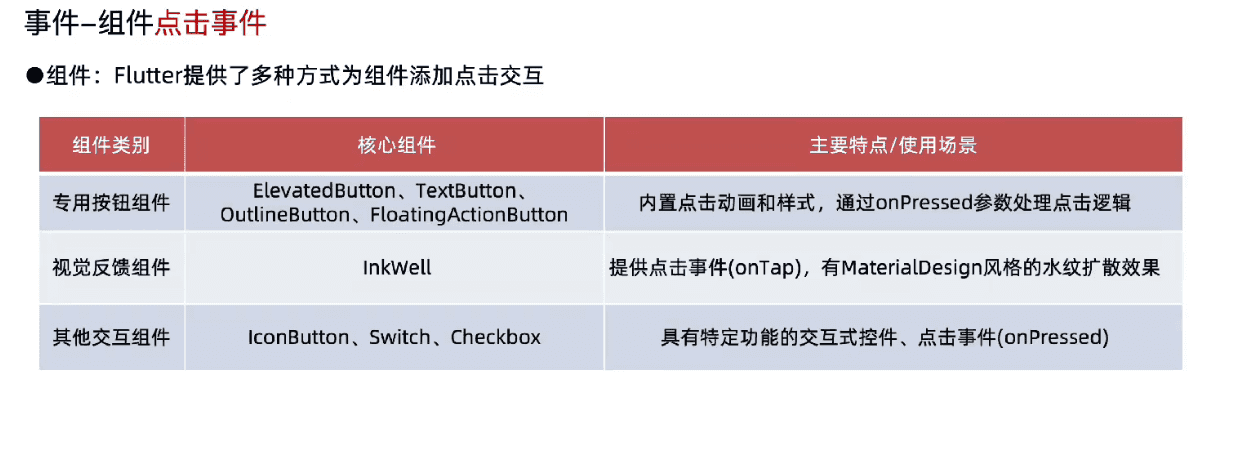
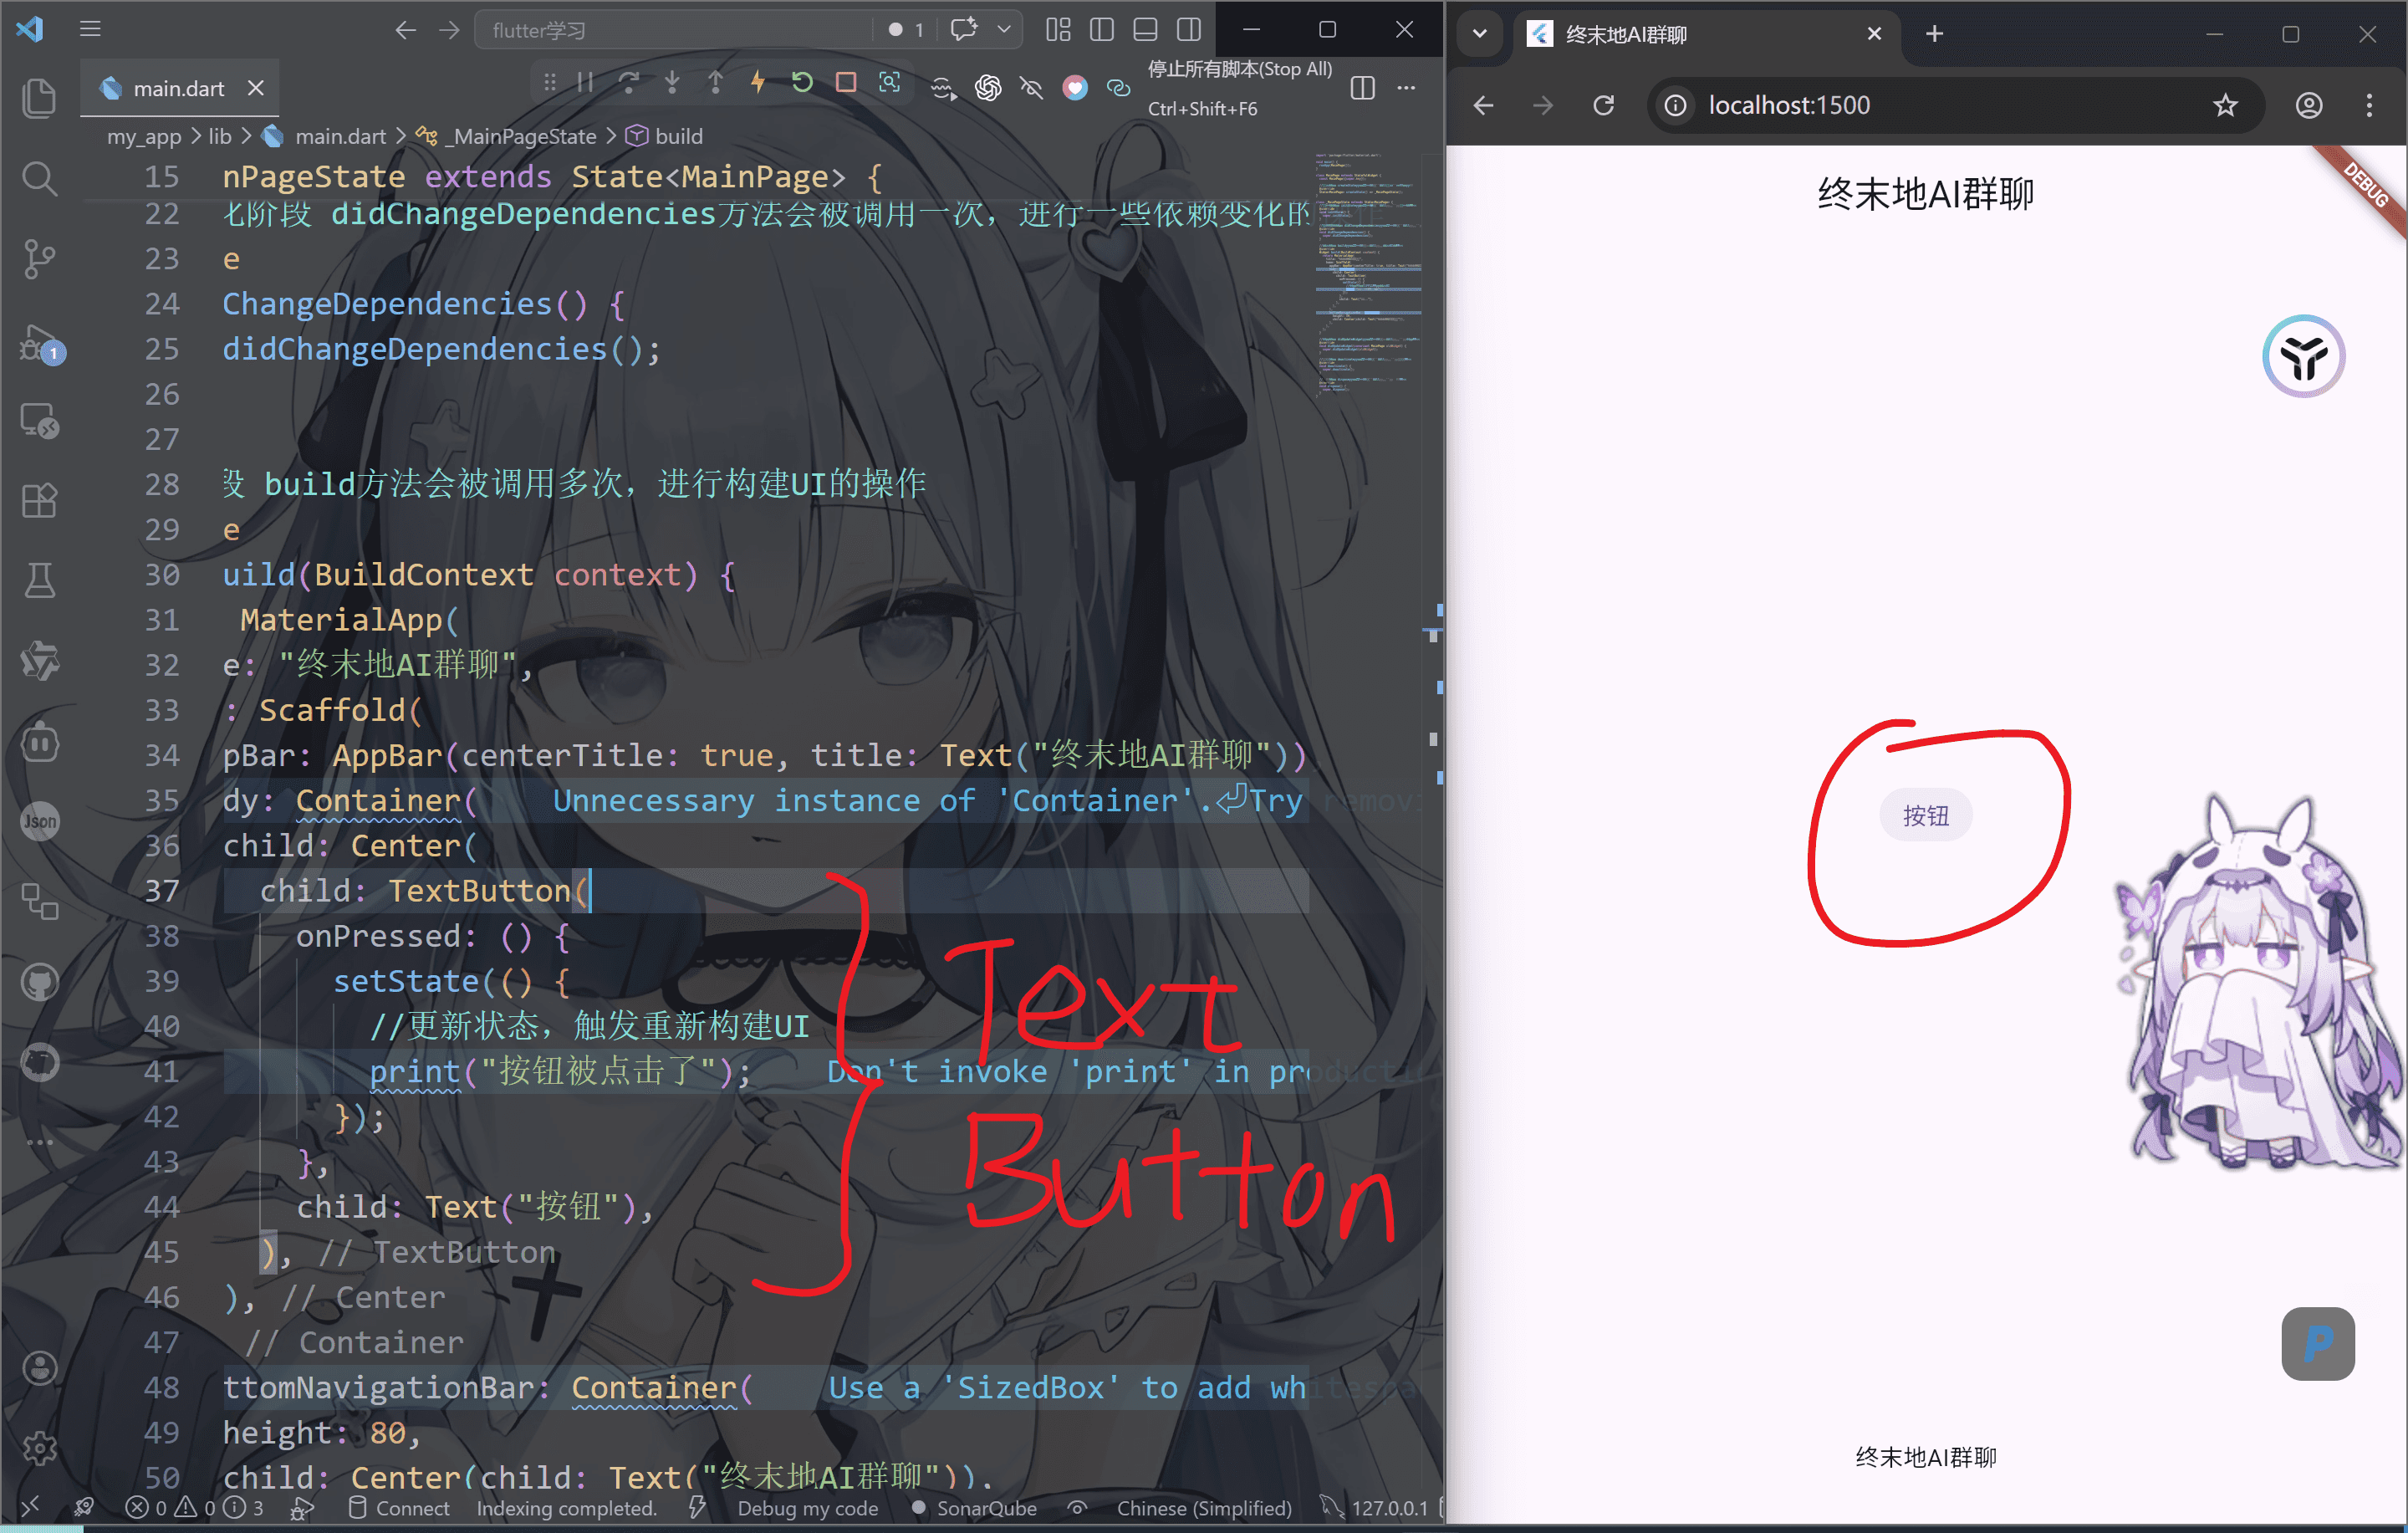
事件-组件点击事件
1
2
3
4
5
6
7
8
9
10
11
12
13
14
15
16
17
18
19
20
21
22
23
24
25
26
27
28
29
30
31
32
33
34
35
36
37
38
39
40
41
42
43
44
45
46
47
48
49
50
51
52
53
54
55
56
57
58
59
60
61
62
63
64
65
66
67
68
69
70
71
72
73
74
| import 'package:flutter/material.dart';
void main() {
runApp(MainPage());
}
class MainPage extends StatefulWidget {
const MainPage({super.key});
@override
State<MainPage> createState() => _MainPageState();
}
class _MainPageState extends State<MainPage> {
@override
void initState() {
super.initState();
}
@override
void didChangeDependencies() {
super.didChangeDependencies();
}
@override
Widget build(BuildContext context) {
return MaterialApp(
title: "终末地AI群聊",
home: Scaffold(
appBar: AppBar(centerTitle: true, title: Text("终末地AI群聊")),
body: Container(
child: Center(
child: TextButton(
onPressed: () {
setState(() {
print("按钮被点击了");
});
},
child: Text("按钮"),
),
),
),
bottomNavigationBar: Container(
height: 80,
child: Center(child: Text("终末地AI群聊")),
),
),
);
}
@override
void didUpdateWidget(covariant MainPage oldWidget) {
super.didUpdateWidget(oldWidget);
}
@override
void deactivate() {
super.deactivate();
}
@override
void dispose() {
super.dispose();
}
}
|
状态更新-setState
语法:数据的变化要更新UI视图,需要执行setState方法,setState方法会造成build的重新执行。
告诉 Flutter:数据变了,请重新调用 build() 刷新界面
例如我们写一个计数器
1
2
3
4
5
6
7
8
9
10
11
12
13
14
15
16
17
18
19
20
21
22
23
24
25
26
27
28
29
30
31
32
33
34
35
36
37
38
39
40
41
42
43
44
45
46
47
48
49
50
51
52
53
54
55
| import 'package:flutter/material.dart';
void main() {
runApp(MainPage());
}
class MainPage extends StatefulWidget {
const MainPage({super.key});
@override
State<MainPage> createState() => _MainPageState();
}
class _MainPageState extends State<MainPage> {
int count = 0;
@override
Widget build(BuildContext context) {
return MaterialApp(
title: "终末地AI群聊",
home: Scaffold(
appBar: AppBar(centerTitle: true, title: Text("终末地AI群聊")),
body: Center(
child: Row(
children: [
TextButton(
onPressed: () {
count -= 1;
print(count);
},
child: Text("减"),
),
Text(count.toString()),
TextButton(
onPressed: () {
count += 1;
print(count);
},
child: Text("加"),
),
],
),
),
bottomNavigationBar: Container(
height: 80,
child: Center(child: Text("终末地AI群聊")),
),
),
);
}
}
|
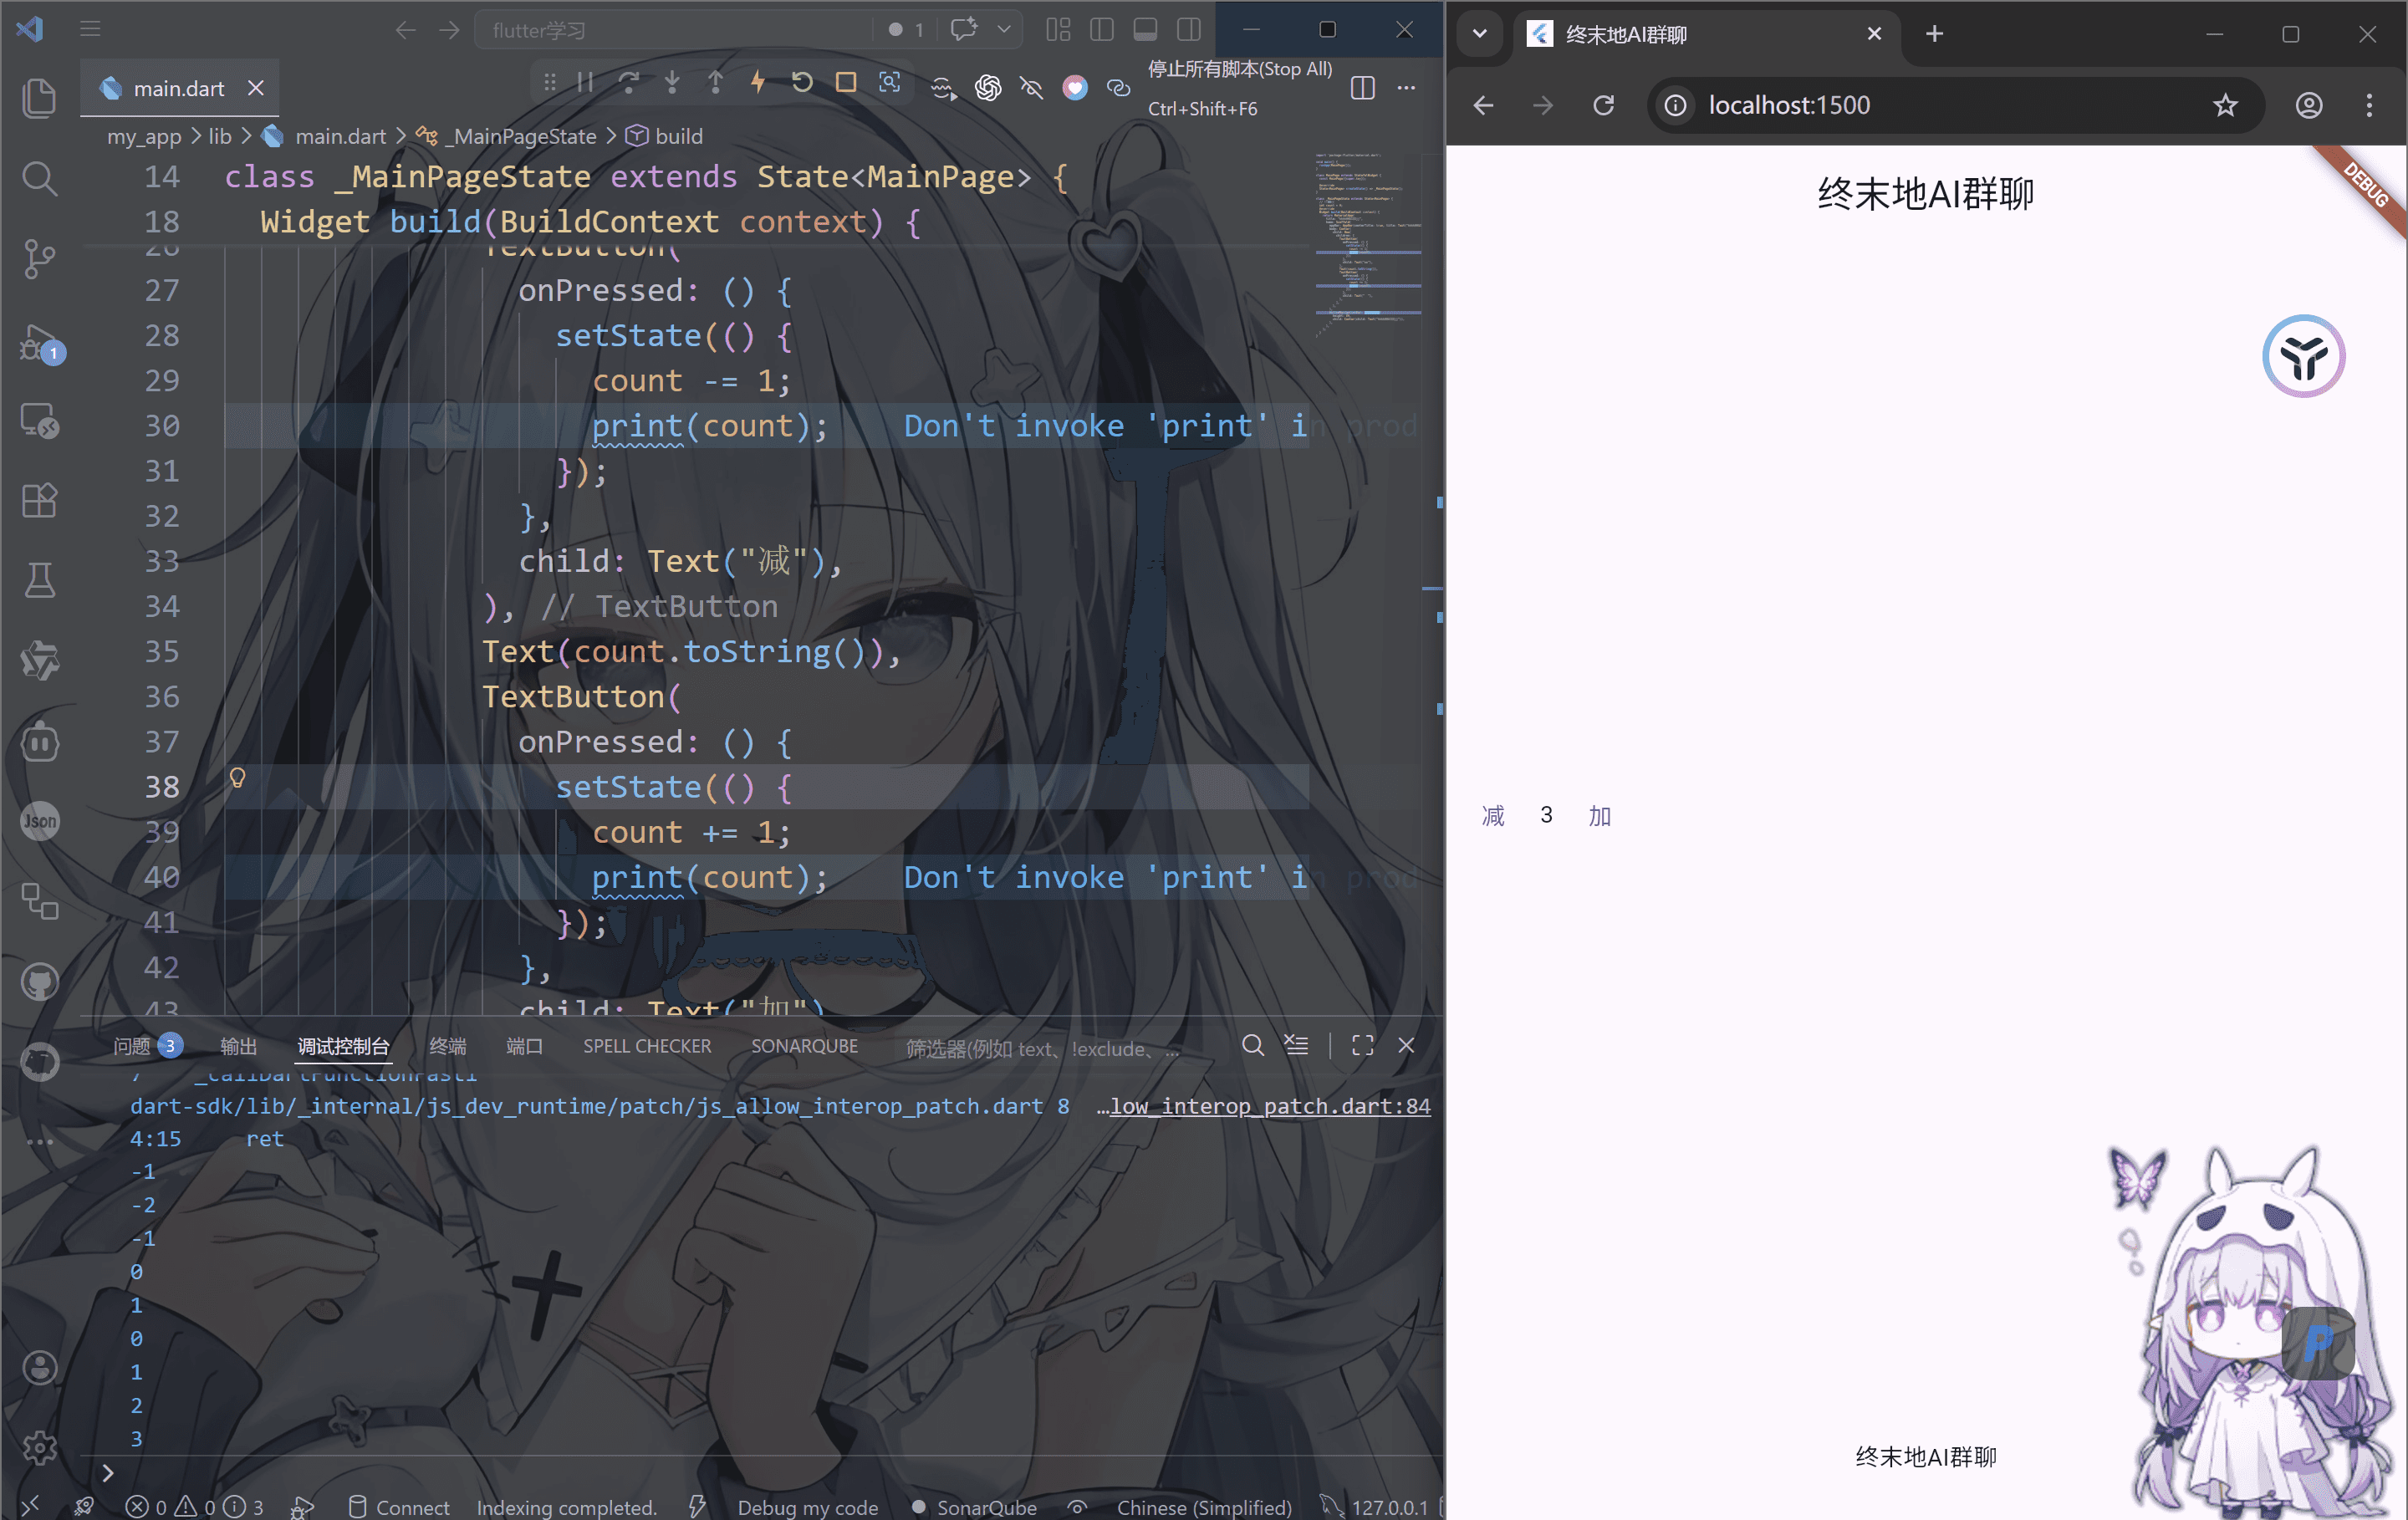
此时我们发现点击加减号时中间的数字不会改变,这是因为我们没有添加setState状态监测
此时我们加上serState,然后点击加或者减就会看到中间的数字发生改变
1
2
3
4
5
6
7
8
9
10
11
12
13
14
15
16
17
18
19
20
21
22
23
24
25
26
27
28
29
30
31
32
33
34
35
36
37
38
39
40
41
42
43
44
45
46
47
48
49
50
51
52
53
54
55
56
57
58
59
60
61
62
63
64
65
66
| import 'package:flutter/material.dart';
void main() {
runApp(MainPage());
}
class MainPage extends StatefulWidget {
const MainPage({super.key});
@override
State<MainPage> createState() => _MainPageState();
}
class _MainPageState extends State<MainPage> {
int count = 0;
@override
Widget build(BuildContext context) {
return MaterialApp(
title: "终末地AI群聊",
home: Scaffold(
appBar: AppBar(centerTitle: true, title: Text("终末地AI群聊")),
body: Center(
child: Row(
children: [
TextButton(
onPressed: () {
setState(() {
count -= 1;
print(count);
});
},
child: Text("减"),
),
Text(count.toString()),
TextButton(
onPressed: () {
setState(() {
count += 1;
print(count);
});
},
child: Text("加"),
),
],
),
),
bottomNavigationBar: Container(
height: 80,
child: Center(child: Text("终末地AI群聊")),
),
),
);
}
}
|


评论区